How to Insulate Your Basement Walls with Foam it Green
How to Insulate
Your Basement Walls with Foam it Green
Installing Foam it Green on the basement walls as part of a finished basement project I was able to cut my heating costs drastically...I'm now heating twice the square footage for approximately 30% less than I did during last years mild winter. - Michael G. Howard, PA
Use Closed Cell Foam it Green for Basement Walls
Insulating basement walls with Foam it Green is quick and easy to do. Plus the benefits range from much lower utility bills to reduced sound transfer.
By using Closed Cell Foam it Green, you create a seamless air barrier and high r-value that will keep your home much warmer in the winter and cooler in the summer.
The rigid foam creates a pest barrier that helps keep insects, rodents, and even radon gas out. And because it never sags nor settles, once it's in place, it's done, unlike fiberglass.
 How to Quickly and Easily Insulate Basement Walls:
Download this page as a printable PDF >>
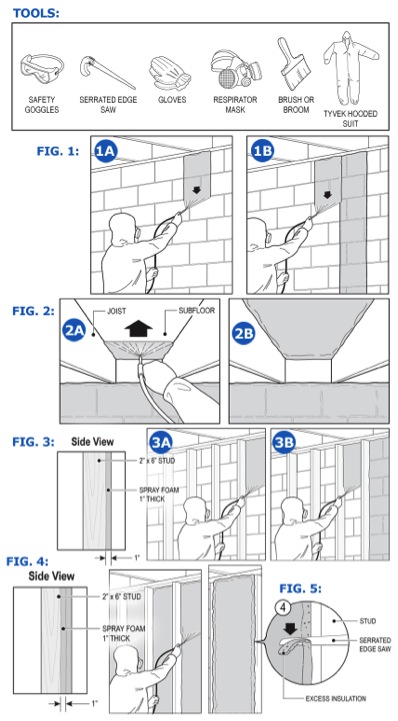
1) Follow all of the instructions in the included instruction manual regarding proper Foam it Green setup, project area preparation, and substrate readiness. Make sure that you have all of the tools required for the job. (see Tools)
2) Make sure foundation walls are dry, broom clean, and in the correct temperature range.
IF NOT USING STUDS:
1) Apply closed cell foam to achieve 1” cured layers, sprayed directly to the foundation walls (Fig. 1). Spray between floor joists above the foundation wall, all the way up to the subfloor above (Fig. 2).
IF USING STUDS:
1) (If the studs are not yet up, it is advised to set them 1-2” in front of the foundation walls. The space allows for the foam to seal behind the studs, creating a continuous air and insulation barrier.) Apply closed cell foam to achieve 1” cured layers, making sure the foam is applied to the joints connecting the studs to the substrate.
(Fig. 3)
2) Spray additional closed cell foam to achieve 1” cured layers each, to the desired final depth. (Fig. 4)
3) If the foam expands past the studs, it can be trimmed flat with any serrated edge before enclosing the wall. (Fig. 5)
ADDITIONAL NOTES:
1) If the building is heated during colder months, and using a combination of insulation materials in the wall cavity you intend to close in with drywall or paneling, such as fiberglass, cellulose, rock wool, or open cell foam over the closed cell foam, it is recommended to apply a final minimum thickness of 2” of closed cell foam first. A
minimum thickness of 1” is recommended for climates in which no heat/furnace is used.
2) It is recommended to apply a vapor barrier before installing the desired wall covering such as drywall or
paneling.
Download this page as a printable PDF >>
Call 1-800-516-0949 for help in purchasing your kits.
Save money when you buy online.
Find the kit that's right for you. In 60 seconds you'll be on your way to using the foam that costs you less.
